Removing Wallpaper

Admin • January 24, 2022

Getting ready to redecorate and need to remove wallpaper from the walls? Wallpaper removal may sound like a huge task, but follow the proper techniques and removing wallpaper is actually very simple.

REMOVING YOUR WALLPAPER

Figure out what kind of wallpaper you are working with! Try removing some without water or a wallpaper remover. How it comes off the walls will tell you what kind of wallpaper it is.

Peel and Stick – will peel off the wall in full sheets

Strippable – will easily come off the wall in full sheets

Traditional wallpaper – will be harder to remove and come off in smaller sections

Wallpaper with a removable top layer – top layer will remove fairly easily, but will leave a paper backing on the wall

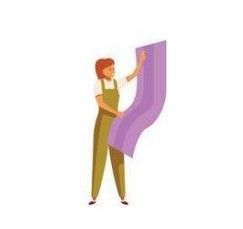
Peel and Stick Wallpaper

Start at the top corner and pull the wallcovering down gently but firmly, working parallel to the wall.If you plan on reusing the peel and stick wallpaper, pull it down slowly and gently. You can easily over-stretch it.Pro Tip! Don’t allow the adhesive sides of the wallpaper to make contact, especially if you want to reuse it. They are very difficult to separate once they have touched.

Strippable Wallpaper

At the top of the wallpapered section, find a loose corner or peel back a small section with a utility knife or scraper. Pull the entire sheet straight down, keeping your hands close to the section that is still attached to the wall.                                           


If you are having a hard time removing it, spray the front with water to help activate the paste.Repeat with all sheets of wallpaper.If a particular section of strippable wallpaper seems stuck, use a little bit of water on a sponge or in a spray bottle to loosen the paste.


Pro Tip! Use warm water and a sponge to wipe down the walls, cleaning off any small bits of paste that didn’t come off when you removed the paper. DON’T use fabric softener that will leave a residue on your wall!

Traditional Wallpaper 

Traditional wallpaper includes both some wallpaper that removes in full strips and some that removes in layers. Traditional wallpaper removes most easily when using proper removal tools. We recommend products like CHOMP (fast-acting, bio-enzymatic & eco safe,) & Paper Tiger and follow their instructions. You want to penetrate the paper and get to the paste.


Working in 3 foot sections, soak the scored wallpaper with hot water or wallpaper remover. 


DON’T use fabric softener that will leave a residue on your wall!


Use a scraper or spackling knife to remove the soaked wallpaper, making sure to not damage the wall underneath. Alternatively, you can rent a wallpaper steamer.


Pro Tip! If your wallpaper is hung on drywall, make sure you don’t over-saturate for long periods of time. It’s okay to get it damp for a short period of time, but longer exposure can cause damage. Hopefully your old paper was installed over a painted surface with a coat of sizing.


Wallpaper with a Peelable Top Layer (Such as a vinyl, can be removed while its backing remains on the wall, making removal a 2-step process.)


Strip off the top layer of the wallpaper. If it gets stuck, use warm water on a sponge or in a spray bottle to loosen. It should come down easily to reveal the paper and paste backing.


We recommend products like CHOMP to saturate the paper backing remaining on the wall.


Make sure you have removed all paste and residue by wiping down with a sponge and warm water Use a scraper or spackling knife, scrape the paper away from the wall. . DON’T use fabric softener that will leave a residue on your wall!

Finishing Up

Now that all the wallpaper is removed, give the walls 2-3 days to dry completely. Leave a fan or two running in the space to ensure proper air circulation. After a few days, your space is ready to redecorate and hang your new vibrant wallpaper. Make sure your wall is smooth, painted and you apply a coat of sizing before hanging new wallpaper. If you’re not confident doing it yourself, PERSPECTIVES will gladly give you a referral list of Professional Wallpaper hangers.

July 14, 2025
1. Prepare the Wall: Clean the walls thoroughly, remove any existing wallpaper, and repair any damage. Don’t use Dawn or any other house soap because it will leave glycerin build up on the wall. Never apply paper to an unpainted surface like drywall. APPLY sizing to the wall, to ensure proper adhesion and easier removal. If you are hanging light-colored wallpaper over a dark color or a dark color over a lighter color TINT your sizing to prevent the old color showing through. Read the directions on your sizing for specific drying times. 2. Measure and Cut: Before starting make sure that the run numbers on all rolls are the same. Cut one piece to start. Measure the wall height and add a few extra inches to the top and bottom of each strip. Cut the wallpaper strip according to your measurements. For additional strips, make sure to allow for pattern match. Before cutting the next strip, hold the paper up to the strip on the wall to see where the pattern match is and determine how long to cut the next strip. If you are working with multiple rolls, you can sometimes reduce waste by cutting the next strip from another roll. Since you can only return full, uncut rolls, make sure that you will need paper from another roll before cutting it. 3. Apply Paste (if needed): Read your papers’ directions. Some call for applying the paste to the paper and others are “paste the wall”. 4. Book the Wallpaper if required by the instructions by folding the pasted strip in on itself (booking) for a few minutes to allow the paste to activate. Follow the instructions for the correct time to allow the paper to book and fold the paper loosely; don’t crease the paper! 5. Hang the Wallpaper: Start with a straight line. Use a plumb line, chalk line or a laser level line. Align the first strip at the top of the wall, allowing it to overlap a little at the top and bottom, then smooth it onto the wall from top to bottom, working out any air bubbles with a smoother and a wet sponge. 6. Trim the overlap: Trim the excess paper at the ceiling and baseboard. Use a straight edge and a very sharp cutter. Ensure seams are properly aligned and pressed firmly to the wall and use gently a roller tool if appropriate. Be careful not to press too hard when smoothing so you don’t squeeze all the paste out, especially at seams. 7. Finishing: Clean any excess paste from the wall using clean clear water. Don’t hang anything on your new wallpaper including electrical outlet covers, paintings, shelves and other fixtures for at least 24 hours.. Tips for Success: Don't stretch the paper: Avoid pulling or stretching the wallpaper while hanging, as this can distort the pattern and cause seams to separate when the paper dries. Work with a partner: Having someone to help guide the paper and hold edges can make the process smoother, especially with larger patterns. practice with a small section: If you're new to wallpapering, practice on a hidden area of the wall, like behind a door or with a small piece of wallpaper to get the “hang” of the process.
Several painting supplies on wooden floor, comprised of 3 brushes and a bucket of blue paint.
May 6, 2025
Read about essential painting supplies in Georgetown, KY, that professionals rely on with Perspectives Inc. Click here and find out more!
March 29, 2025
1. Move all furniture – tables, chairs, grills, planters, etc. off deck.
A cartoon illustration of a woman wearing an apron.
By Jason Taylor August 28, 2024
Discover the right sandpaper for your project with our comprehensive grit guide. From coarse to ultra-fine, choose the best sandpaper for your sanding needs.
A woman in an apron is standing next to a sign that says `` let 's talk caulk ''.
August 22, 2024
Learn about the best caulk products for different projects, from kitchens to exteriors. Get expert advice on selecting the right caulk for your needs.
June 17, 2024
Master the art of painting and design with tips and tricks from Perspectives Inc. in Lexington, KY. Click here to learn more about our renovation insights.
A person is using a high pressure washer to clean a wooden deck.
May 15, 2024
Learn the one thing you should never do when cleaning your deck to avoid damage. Get expert tips on maintaining a beautiful and safe outdoor space.
Painting Tips from Mary — Lexington, KY — Perspectives Inc.
By Admin October 19, 2023
Get expert tips on prepping for a perfect paint job. From cleaning walls to covering trim, follow these essential steps for a professional finish.
Painting Tips from Mary — Lexington, KY — Perspectives Inc.
By Admin October 18, 2023
Master professional painting techniques with our expert tips. Learn how to achieve smooth, streak-free results and perfect your painting skills with ease.
Painting Tips from Mary — Lexington, KY — Perspectives Inc.
By Admin October 17, 2023
Learn the essential painting techniques to achieve a professional look. From brush to roller, get expert tips for a flawless finish on your next project.
More Posts